This article describes how to configure MailScanner in cPanel. MailScanner is an anti-spam/anti-virus suite consisting of several open source utilities including: MailScanner, SpamAssassin, ClamAV, DCC and Vipuls Razor. Together, these utilities can dramatically reduce the amount of spam and viruses that make it to your email inbox. To configure Mailscanner for your domain(s), please follow the tutorial below.
- Login to cPanel for your hosting account
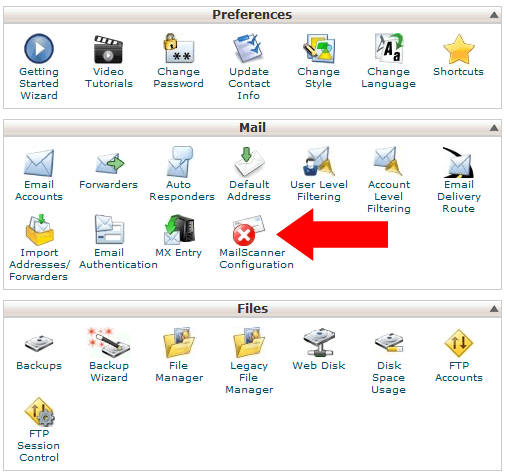
- In the "Mail" section, click on the MailScanner link/icon
- On the Mailserver Configuration screen, you will see 2 settings groups, along with 2 settings links.
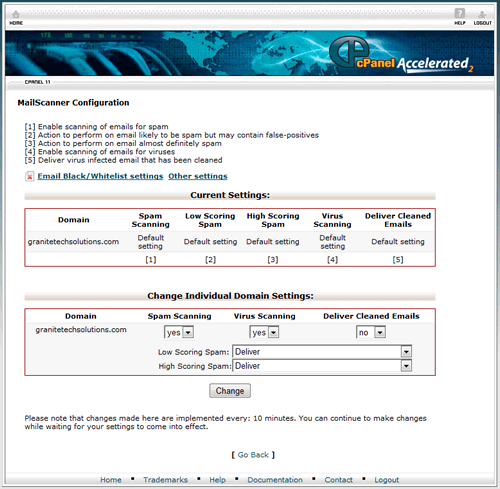
- The "Current Settings" section shows you the current settings configuration for your domain(s).
- The "Change Individual Domain Settings" section allows you to configure each of the settings for each of your domains listed under your account. These settings are described below:
Spam Scanning - Enables the scanning of emails for spam. Options are yes/no.
Virus Scanning - Enables the scanning of emails for viruses. Options are yes/no.
Deliver Cleaned Emails - Enables the delivery of emails�in which viruses�have been removed.
Low Scoring Spam - Tells�MailScanner what to do with emails determined likely to be spam, but that could also be false positives. Options are Deliver, Delete, or forward to a spam@yourdomain.com. NOTE: If you use the option to forward to a spam address, you will need to create the email account afterwards. The Low Scoring Spam Setting determines what the initial spam score/threshold will be for Low Scoring spam. The default setting is 5.
High Scoring Spam - Tells MailScanner what to do with emails determined to�almost definitely be spam.�The High Scoring Spam Setting determines what the initial spam score/threshold will be for High Scoring spam. The default setting is 20.
So ... here is an�example of spam handling based upon spam scores.
Low Spam Score Setting = 5
High Spam Score Setting = 20
Spam Score = Rule that will be applied
1 - 4 = Messages that will not be flagged/marked as spam and will be delivered normally.
5 - 19 = Messages that will be flagged/marked as low scoring spam and will apply the handling rule you have defined (Deliver or Delete)
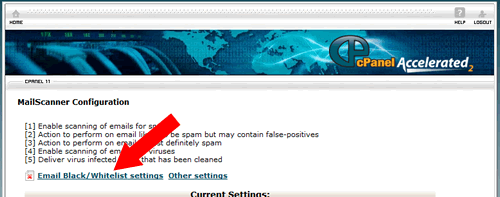
20 - 30 = Messages that will be flagged/marked as high scoring spam and will apply the handling rule you have defined (Deliver or Delete) - The "Email Black/Whitelist settings" link is used to configure your email whitelist/blacklist.
- The Spam Whitelist section allows you to configure your whitelist of email address that you want to always allow to be delivered.
Allowed Format: *@domain.com or name@domain.com or IP address, only one entry per line. Up to 30 entries are allowed. - The "Spam Blacklist" section allows you to configure your blacklist of email addresses that will always be flagged as high scoring spam.
Allowed Format: *@domain.com or name@domain.com or IP address, only one entry per line. Up to 30 entries are allowed.
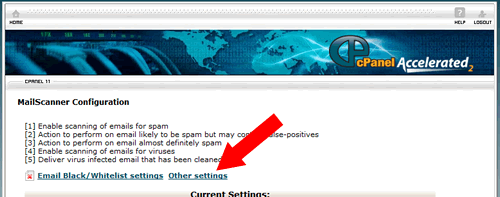
- The "Other Settings" link is used to access the spam scoring system and additional settings.
This section is used to configure the spam scoring system and how to rate emails based upon their spam score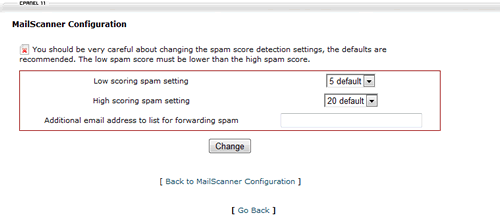
These settings are described below:
Low scoring spam setting - Determines the spam score that will result in an email being flagged as Low Scoring Spam. The default setting is 5.
High scoring spam setting - Determines the spam score that will result in an email being flagged as High Scoring Spam. The default setting is 20.
Additional email address to list for forwarding spam - Allows you to specify an additional email address to forward emails that have been determined to be spam. If an address is specified here, then no email will be delivered to the original recipient address, only the forwarding address.
�
